Hair Weave Bonding Technique
Glue Bonding Hair Weave
Now bonding hair weave isn't everyone's favourite attachment technique for a variety of reasons. Some think it creates too much tension (pull) on the hair and others think it's removal can be damaging to the hair (or they've experienced damage during removal). If you'd prefer a method that didn't involve glue then why not check out the net weaving guide.
The last thing anyone wants to do is damage their hair; so before outlining the basics of this method of weave attachment, please note that we're not here to encourage or discourage your personal choice for your hair... OK disclaimer over, let's crack on.
Well... not quite, there are still a couple of preliminaries to go through before the actual method.
Firstly, if you haven't already bought your hair extensions, then think about whether you'd prefer single tied wefts or double tied wefts.
Single tied wefts typically have less hair than double tied wefts - this has the advantage of there being less pull on your own growth hair and creating less bulk especially near the crown of your head.
Double tied wefts typically have more hair than single tied wefts - this has the advantage of creating a fuller look, but it may also add bulk. In order to minimise bulk at the crown, you can add more space between tracks (the how to make a wig guide explains this with images).
If you have already bought your weave hair extensions and think you have the wrong kind, then contact your retailer about returning the hair extensions).
Secondly, this method is not for use with tape hair or skin weft hair extensions - there'll be a guide for those, but this isn't it.
Glue Bonding Hair Weave Tools
You will need:
Bonding Glue
Hair clips to hold hair back as you bond
Scissors
Hair Wefts
Glue Bonding Hair Weave Method:
Let's work on the basis that you're growth hair has been washed, conditioned and dried.
You'll be pleased to note that there's no braiding required!
Divide the hair into sections - for example starting at the back of your head ear to ear, tie up the top part of your hair and leave the rest down.
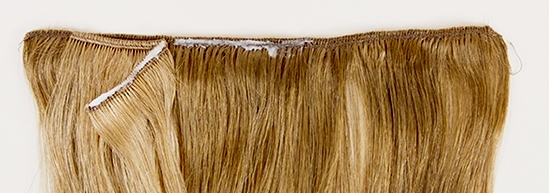
Add a small amount of bonding glue to the weft as in the image (do not put the glue on your own hair) and wait for a few seconds for the glue to become tacky to the touch.
Place the glue covered air weave along the section of hair.
As far as is humanly possible, try not get the glue onto your scalp.
 Bonding glue on weave hair extensions
You can use a hairdryer on a low heat setting to help set the glue.
Continue to create sections and apply the hair weave until you achieve the look you’re after.
To remove the bonding use a special bonding glue remover (solvent) – It’s never a good idea to try to remove bonded hair wefts without a remover as you can tear your own hair.
Things to Consider:
Try not to add tracks near your hairline for two reasons:
- The tracks will show when your hair moves
- The hairs at the hairline can easily be pulled out due to the weight of the track and over time this can precipitate traction alopecia (where there is gradual hair loss, caused primarily by a pulling force that is applied to natural hair)
Although glue bonded weave hair can last for up to two months, it might not be a good idea to leave it in more than a month as this can make it more difficult to remove.
This method of weave hair extension attachment requires slow and steady hands and a great deal of dexterity, so a hairdresser is probably the best place to start.
Once you've attached your glue-in weave hair you're free to style and can check out the guide to daily styling weave hair products for glue-in weave hair as well as the guides for washing glue in weave hair, using nourishing hair oils on glue-in weaves and how to condition glue-in weaves.
If you'd like to keep up to date with articles and guides, then why not join our blog, it's easy to do and doesn't require any personal info - yay!
From Bonding Technique to Weaving Main Page
Jump From Hair Weave Bonding Info to Home Page


