- Home
- Make Your Own Wig
- Create Weave Fringe Bangs
DIY Wig With Bangs and Lace Closure
How To Use Closure and a Fringe (bang) on your DIY Wig
Hey there, DIYers, this DIY wig with bangs (fringe) and lace closure guide shows you how to add a fringe piece (or bangs if you're not into British terms) as well as a closure piece to your DIY weave wig.
If you'd like to see the whole process of making a wig with weave then check out the DIY Wig Guide to see how to review weft placement and how to make your own closure piece from hair weave if you don't have a lace closure piece, yay!
DIY Wig With Bangs (Fringe) and Lace Closure Piece
Top Tips:
Adapt this guide to suit your situation.
If you don't have ready-made fringe weave(bang weave) then use regular hair weave for the fringe piece (bang piece).
Remember not to cut the fringe (bangs) until after you've attached them (unless of course you're confident enough to do that first)
If you like to live on the easy side of the street (or you've never sewn weave before) then you can use bonding glue instead of sewing the hair weave... just make sure you also have bonding glue remover to clean up any excess.
Hmm... what about just cutting a fringe (bangs) into a hair weave or a DIY hair weave wig? Good question, check out the guide to cutting your own fringe bangs into hair weave if adding separate weave fringe (bang) pieces isn't for you.
As always, the caveat is that we're not professional wig makers, but definitely have first-hand experience of making wigs for personal use, so feel free to use this as jumping off point and add your own spin.
Tools for DIY Wig With Bangs and Lace Closure

- Your almost finished DIY wig on a polystyrene head or mannequin head or canvass head
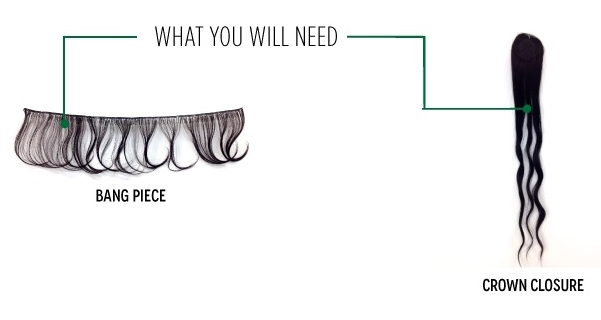
- Ready made fringe piece (bang piece) Or hair wefts - about a third of a bundle should be more than enough
- Lace closure piece (unless making your own)
- Thread and curved needle for the sew-in method
- Bonding Glue (for the no-sew method)
- Bonding Glue Remover (we all make mistakes, so just in case)
- Scissors
- Tape measure to measure the width of the fringe (bangs)
- Polystyrene (Styrofoam) or mannequin head
- Pearl headed pins (really helpful to pin the pieces on so you can get a good visual before attaching).
Adding a fringe (bangs) and lace closure to your DIY wig
Step 1a
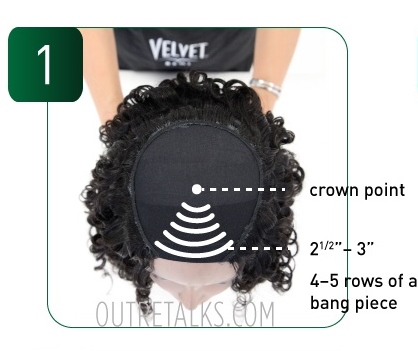
Mark the crown point about 6.5 - 8 cm (2.5 - 3 inches) from the front hairline - this will be where the lace closure or your DIY closure will be placed.
You can mark the crown on the wig cap using chalk or a pin.
Step 1b
The width of the section for your fringe (bangs) should be the width of the eyebrows (outer corner of each eye).
Measure this length using a tape measure then cut the first length of hair weave which will be used at the front of the hairline.
It's better to be a bit generous with your measurement because you can always cut it shorter if necessary.
Step 1c
The front of the wig should be facing you.
Start at the front of the hairline (forehead) and work towards the crown point.
Place about 4-5 tracks (rows) of hair weave closely together in a curved pattern like the photograph.
You can use more than 5 rows if you want a fuller look.
Step 2
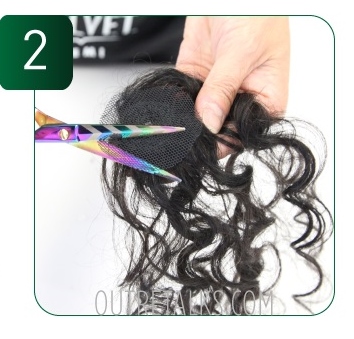
Next, take the lace closure piece and cut away the excess lace around the edges.
No Lace Closure?
You can create your own closure piece out of weft hair - follows steps 7-9 of this DIY Wig Guide.
Step 3
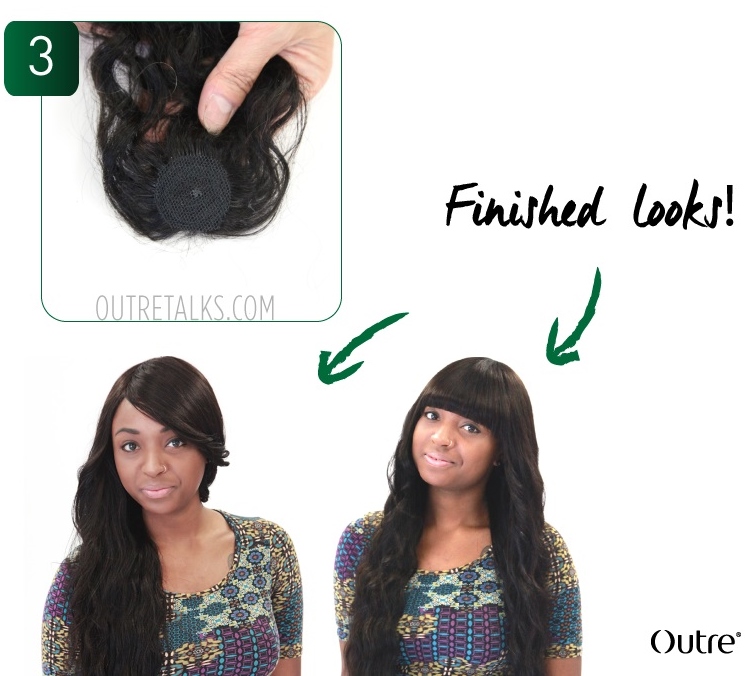
Apply a thin layer of bonding glue on both the open area on the wig cap and on the base of the lace closure piece (or DIY closure piece).
Wait a few minutes to let the glue set, then apply the closure at the top.
You can style the fringe (bangs) to one side by combing the fringe (bangs) to one side.
You can also trim the bang piece to create a blunt fringe (bang) which is sometime called a Chinese bang (Chinese fringe).
You can check out the guide on how to cut fringe bangs if you're not sure how to do it.
Well what do you know! You've just learned how to make a DIY Wig with bangs (fringe) and lace closure in three short steps!
If you have any ideas for other tutorials or want to share tips, use the form below.
Images and basic steps about how to make a wig can be found at http://www.outretalks.com/
How will you make your own wig?
Do you think you'll take the plunge and make your own wig? Will you sew or use glue?
Why not share your ideas about this wig-making guide or your plans for making your own wig.
If you want to be the first to know about our next guide about how to make wig or anything else to do with lace wigs, hair extensions or hairpieces, then why not join our blog, it's easy to do and doesn't require an email address.
Jump from DIY Wig With Bangs and Lace Closure to Make a Wig Page
Jump From DIY Wig With Bangs and Lace Closure to Home Page


